Tractor Plug Aerators: Your Key to a Thriving Lawn and Garden
Achieving optimal soil health is critical for lush lawns and bountiful gardens. A tractor plug aerator (also known as a core aerator) is a powerful tool that significantly improves soil conditions. This guide provides comprehensive instructions and expert advice to help you master this important technique.
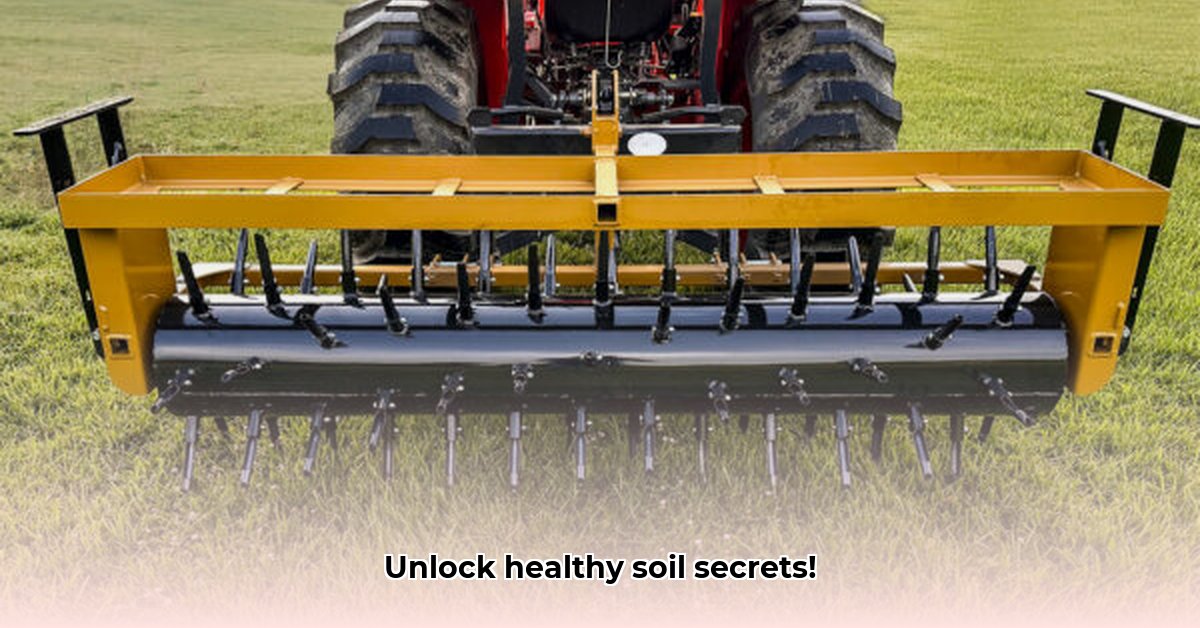
Understanding Tractor Plug Aerators: More Than Just Holes in the Ground
A tractor plug aerator punches small, cylindrical holes into the ground. This "core aeration" process alleviates compaction, improving air circulation, water penetration, and root growth. It's particularly beneficial for areas with heavy foot traffic, compacted clay soils, or significant thatch buildup. Unlike slitting, which only creates slits, core aeration removes soil cores, leaving beneficial air pockets. Think of it as giving your soil a revitalizing deep breath!
Choosing the Right Aerator: Finding Your Perfect Match
Selecting the right aerator depends on several factors:
- Area Size: Larger areas require more powerful, higher-capacity machines for efficient coverage.
- Soil Type: Hard, compacted clay soils need robust aerators with strong tines capable of deep penetration.
- Budget: Aerator prices vary significantly based on features and engine power.
- Aerator Type: Drum aerators (multiple tines on a rotating drum) are generally more affordable, while independent wheel aerators offer greater maneuverability, especially on uneven terrain. "Independent wheel aerators are better for larger areas with obstacles due to their steering capability," advises Dr. Emily Carter, Soil Science Professor at State University.
Mastering the Art of Aeration: Technique is Key
Tine depth is crucial. Shallower aeration (2-3 inches) encourages surface root growth and seed germination. Deeper aeration (4-10 inches) addresses significant compaction and improves drainage. The optimal depth depends on your soil's specific needs and your goals.
Timing also matters. Spring and fall are generally ideal, particularly for managing thatch. However, deep aeration can be done year-round (except when the ground is frozen). Avoid aerating when the soil is excessively wet to prevent damage. "Fall aeration is beneficial for preparing the soil for winter and the upcoming spring planting season," notes Mark Olsen, Extension Agronomist, Department of Agriculture.
A Step-by-Step Guide to Aeration Success
Follow these steps for optimal results:
- Preparation: Inspect the aerator for sharp tines and proper functionality. Check fluids (oil, fuel) and tire pressure.
- Tine Depth Setting: Adjust the depth according to your soil needs. Start shallower and increase as needed.
- Aeration Process: Operate the aerator in overlapping passes for complete coverage. Maintain a consistent, moderate speed to ensure effective penetration.
- Post-Aeration Care: Water thoroughly to settle the soil and promote root growth. Consider applying compost or fertilizer to replenish nutrients, which can significantly boost plant health. Don't forget that proper fertilization after aeration plays a key role in plant growth.
Seasonal Aeration Strategies: A Tailored Approach
Adapt your aeration strategy to the season:
| Season | Aeration Technique | Tine Depth (inches) | Primary Focus |
|---|---|---|---|
| Spring/Fall | Core Aeration | 2-4 | Thatch reduction, improved seed germination |
| Summer | Core Aeration | 4-6 | Improve drainage, reduce compaction |
| Late Summer/Fall | Deep Aeration | 6-10 | Address severe compaction, improve drainage |
Consistent aeration is key for long-term soil health. It's not a one-time fix but a regular maintenance practice.
Risk Assessment and Safety Precautions
While generally safe, using a tractor plug aerator involves risks:
| Risk Category | Likelihood | Severity | Mitigation Strategies |
|---|---|---|---|
| Soil Disturbance | Medium | Low | Proper timing, appropriate depth, follow-up fertilization and seeding. |
| Equipment Damage | Low | Medium | Regular maintenance, careful operation, avoid rocks and other obstacles. |
| Injury (to operator) | Low | High | Follow safety guidelines, wear appropriate safety gear, and be aware of surroundings. |
| Weather Dependence | Medium | Medium | Monitor ground conditions closely. Avoid use on excessively wet or frozen soil. |
Always prioritize safety. Read and understand the aerator's manual thoroughly before operating.
Understanding Your Soil: The Foundation of Successful Aeration
Different soil types require different aeration techniques. Clay soils benefit from deeper aeration (4-6 inches), while sandy soils may only need 3 inches. Silt soils typically require 3-5 inches. Knowing your soil type is the first step to successful aeration.
Choosing the Right Tool for the Job: Tractor Plug Aerators
Consider these factors when choosing a tractor plug aerator:
- Tine Length: Determines aeration depth.
- Tractor Compatibility: Ensure sufficient horsepower and PTO.
- Overlapping Passes: Essential for consistent coverage.
Using the right equipment and proper technique is vital for effective aeration.
A Step-by-Step Guide to Tractor Plug Aeration (continued)
- Assess your lawn: Identify your soil type and compaction levels.
- Choose the correct tine depth: Select tines appropriate for your soil and desired depth.
- Prepare your tractor and aerator: Securely attach the aerator.
- Perform test passes: Test settings and adjust depth as needed.
- Full aeration: Execute overlapping passes across your lawn.
- Post-aeration care: Water thoroughly to settle soil and promote root growth.
Recommended Aeration Depths Based on Soil Type
| Soil Type | Recommended Depth (inches) |
|---|---|
| Clay | 4 - 6 |
| Silt | 3 - 5 |
| Sandy | 3 |
Maximizing Results: Beyond the Depth
Consider these factors for optimal results:
- Timing: Aerate during the grass's active growth period.
- Soil Amendments: Incorporate organic matter like compost.
- Over-seeding: Consider over-seeding after aeration.
Regular aeration, combined with proper soil management, ensures a healthy lawn.